



How to Play Guide
Server Selection
Right after the loading, you can choose the appropriate region on the starting screen.
Making a Team
If you want to be a Captain and travel on one of your tramplers, travel solo or invite Steam friends using the appropriate button.

If you want to join the other Captain’s crew – you should receive an invite from the Captain. Invite to the crew will appear on the same screen.
- If you having an issue with receiving an invite – make sure that both you and your Captain are in the same region.
- If the issue still occurs – re-launch the game.
Trampler Selection
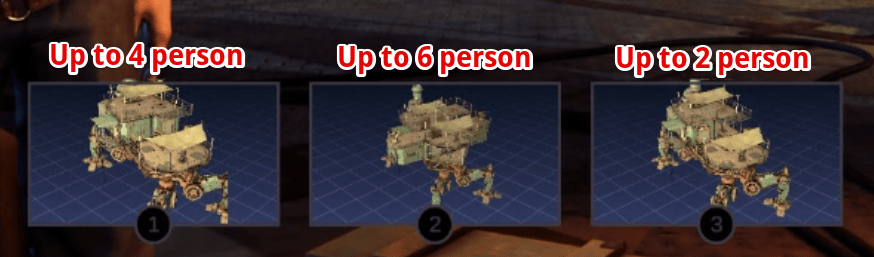
From the start, you are able to select one of 3 available pre-build tramplers. Each one has a designated maximum crew size.
- Make sure that your trampler capacity meets the size of your crew.
- For your first expedition it is recommended to use one of the pre-build tramplers.
Plan Expedition
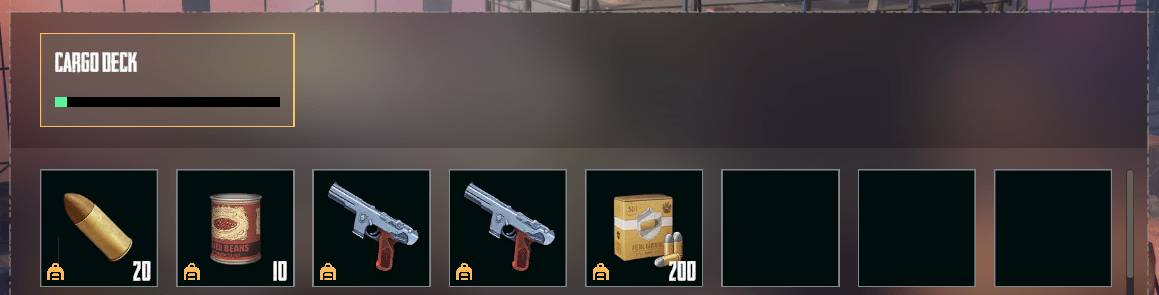
If you are traveling alone here is a suggested basic setup for your first expedition:
- x20 – 80mm Cannon Shell – used for cannon
- x10 – Canned Food – you would need it to re-stock the refrigerator if your crew compartment will be blown up and repaired.
- x2 – O’Donnel “Blitz” SA Pistol
- x200 – 8x21mm Ammo
Not taking all your stuff into the expedition will give you an option for a comeback if your first expedition does not go as planned.
Key Bindings
For now, you can not rebind your controls.

Basic Equipment
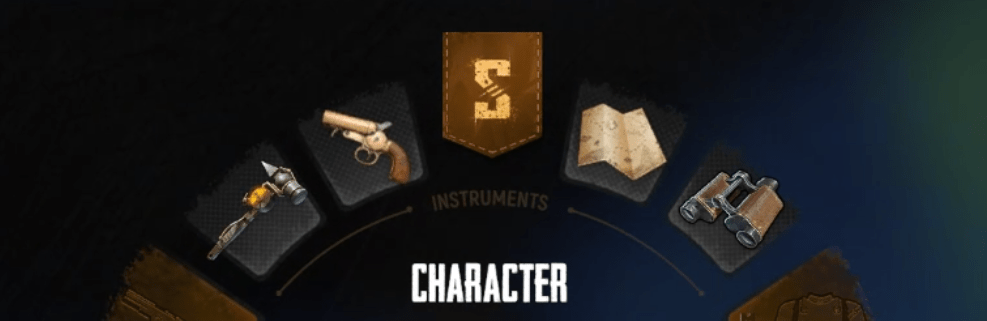
Basic equipment is always with you:
- Multitool – crucial to fix broken compartments, doors, and hatches of your trampler
- Flare gun – helps you to communicate with other tramplers from afar. Also, for now, it is the only source of light in the night.
- Map – helps you navigate. Hold LMB while holding RMB to activate the map cursor.
- Binoculars – help you to watch from afar. Press LMB while holding RMB to switch the distance mode.
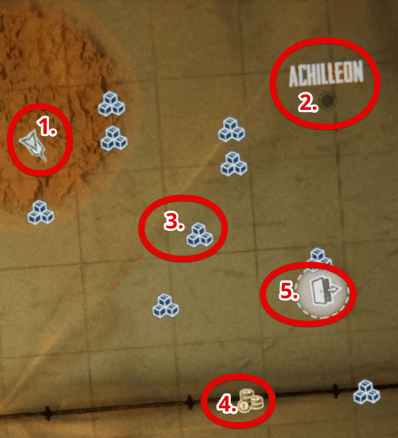
On the map, you would see:
- Your trampler and character
- Islands with names on them
- Contracts
- Pawn shop
- Extraction points
Contracts
Aiming with a map cursor at the contract will show you the conditions. Hold LMB while holding RMB to activate the map cursor.
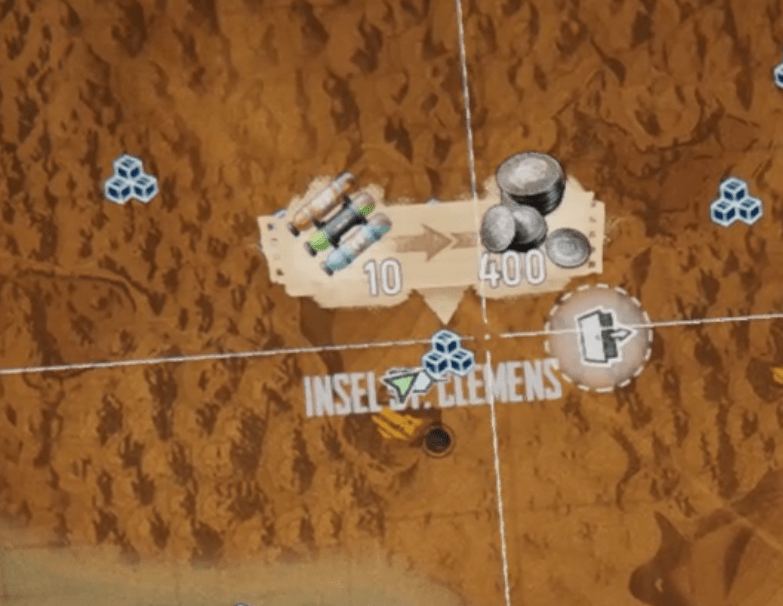
To fulfill the conditions you must bring the box with designated items to the flared spot. All extra items in the box will be considered a gift and you will not get them back or receive a reward for them!

Pawn Shop
- Pawn shop is a special contract. Here you can bring a box full of items you want to sell. All of them will be counted and you will receive an appropriate amount of crowns as a reward.
- Locked boxes can not be sold.
Character Respawn
Respawn is available until you have your trampler, at least one functioning crew room on it, and food in the refrigerator of that crew room.
- If the crew room of your trampler is destroyed – all boxes inside the refrigerator will vanish and respawn will be unavailable.
- After repair, food should be placed inside the refrigerator to be able to respawn.
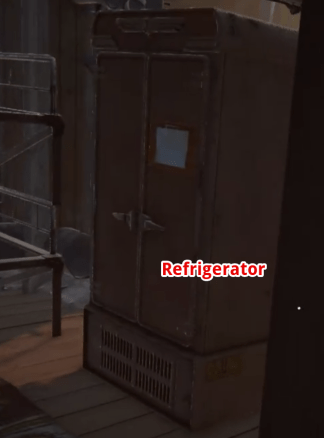
- You will not be able to spawn if the enemy captures or destroys your trampler
- There is a known issue – if you have a few tramplers you must have food in the refrigerators on all of them to respawn correctly.
Black Box
- If you destroy an enemy trampler you can receive a black box near the enemy’s destroyed reactor.
- It is a valuable item that will be sold for crowns upon extraction.

- To extract your loot from the planet you need to get to the extraction point. (Exit signs on map)
- On the extraction you will see 2 radio towers. One broken and one with a ladder to the top.
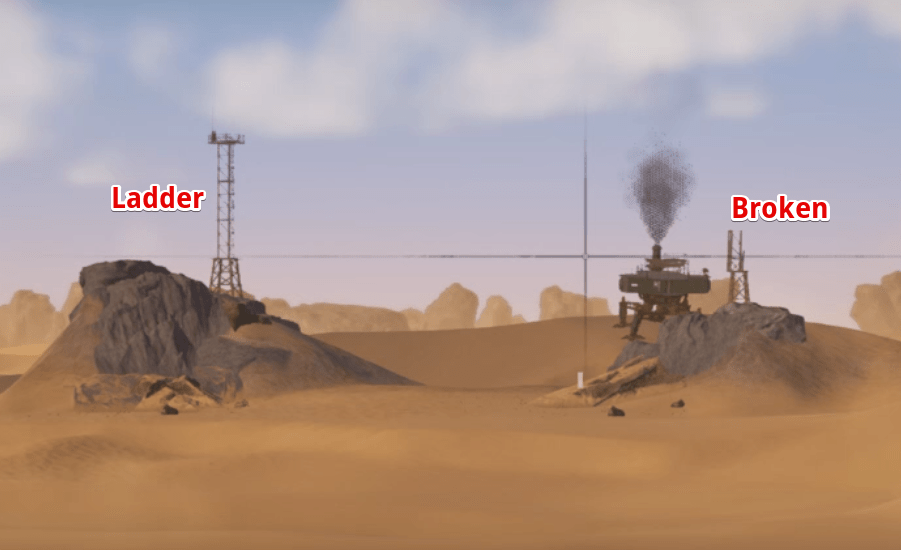
- Remain your trampler inside the extraction zone (between 2 radio towers). Otherwise, you may activate a human extraction instead of a trampler one. In this case, the shuttle will ignore your trampler upon extraction.
A green flare above your trampler means that you activated trampler extraction.
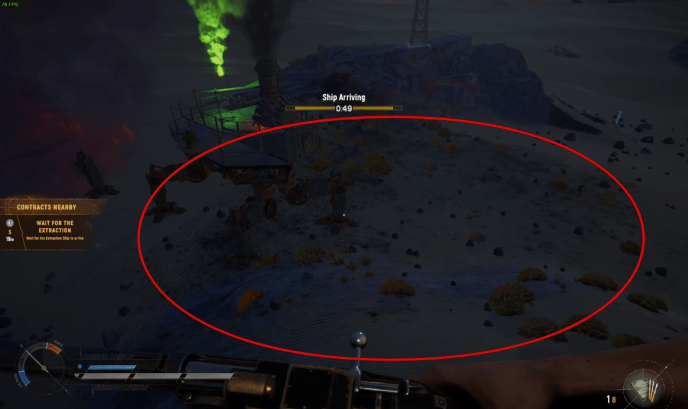
- Get to the top of the tower with a ladder and you will see a radio. Make a long interaction with it to call for extraction.
- Wait a minute for the shuttle to arrive.
Keep an eye on enemy teams. Your extraction can be interrupted using the same radio.
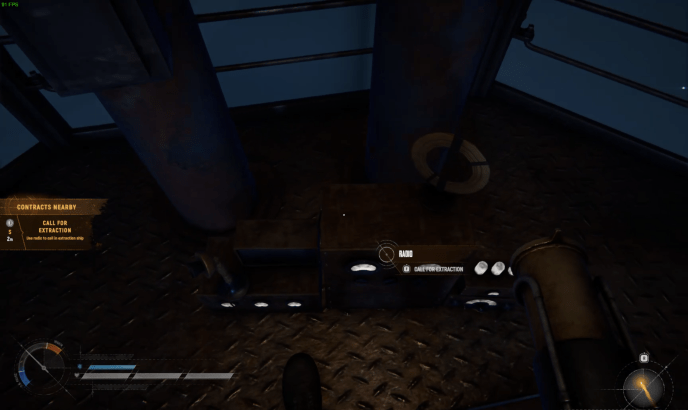
- When the shuttle arrives, go to the extraction ziplines, which are placed near the head of the shuttle. Interact with ropes to leave the planet.
- When all team members get to the extraction ziplines the expedition will be completed.
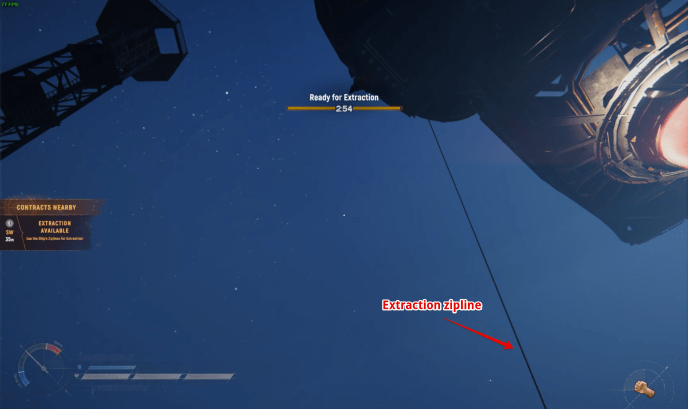
- To extract your trampler only, you have to ignore the ropes and wait for an extra 3 minutes. You can extract your extra captured tramplers this way one by one.
Upon extraction counts:
- Items that are placed on the box racks (in the cargo compartment).
- Boxes inside the refrigerator.
- Ammo in turrets.
- Stuff from team members’ inventories and boxes in team members’ hands.
Items that are placed on the floor will vanish. Some items like valuables, black boxes, and vine boxes will be sold upon extraction. On the result screen, you will receive crowns instead. Locked boxes will vanish if they are not unlocked during the expedition.
Capturing Enemy Tramplers
- To capture an enemy trampler you must get to the enemy captain’s compartment and perform a long interaction with the ownership device.
- Upon capturing you will be able to open the doors and hatches on your new trampler.
- Enemies will no longer be able to spawn on this trampler.
- You can extract the additional trampler to get profit for it.
- Upon capturing a new trampler your team members will automatically link to the beds of the new trampler making it the new spawn point.
There are some known issues with capturing in the current build. To avoid them:
- Keep some food in all of your tramplers’ refrigerators.
- Your team members should re-link their beds back on the original trampler.
- We are working to make your experience better.

Solo Trampler Anti-Hijack Guide
Always Assume Someone Wants Your Trampler
First and foremost, always assume everyone wants to steal your trampler. If you play with that mindset, you’ll never be caught unprepared. The two most vulnerable moments are when you’re at a POI and when you’re extracting.
At a POI
- Always listen for explosions.
- The moment you hear one, immediately return to your trampler and make sure nobody is breaking in.
- Park your trampler where players can’t simply jump onto it. Force them to use your main entrance.
At the Extract
Apply the same principle. Avoid parking where someone can jump directly onto the deck. Position your trampler so you can clearly see your own ladder and entrance from the radio tower.
Build Your Trampler to Make Hijacking Impossible
The best way to prevent hijacking is to make it physically impossible. Players can’t carry unlimited C4. With six inventory slots, assuming they dedicate two stacks to ammo (primary and secondary) and one stack to medical supplies, they can carry a maximum of nine bombs.
This is where trampler design becomes important. The more doors between your entrance and the captain’s room, the better. If you can place 10 or more doors, you’ll almost completely prevent hijacks passively. You’ll often be able to watch your ship get lifted into the air while the raider runs out of explosives before reaching the wheelhouse.
There are many layouts that can achieve this, although they usually require a more expensive trampler. However, that extra cost is almost always far less than the value of the loot from even a short solo run.
For example, my trampler has 12 doors between the entrance and the captain’s room. It costs roughly 1,400 Crowns and 2,000 Mechanical Parts, while my last two-hour run earned nearly 40,000 worth of materials.
Protect Your Reactor and Steering
Your build should also include two additional safety features.
- Enclose your reactor (if you’ve unlocked it).
- Keep your steering enclosed or otherwise inaccessible without opening multiple doors.
The goal is to stop raiders from quickly driving your trampler away. If someone boards, you can turn the reactor off, forcing them to spend extra time powering it back on. Keeping the steering protected also lets you control where the fight takes place. Even if they manage to get the trampler moving, remember that it automatically shuts down once it gets about 40 meters away from you, provided they haven’t fully taken control of it. Don’t panic if they start driving away. Stay where you are, wait for the shutdown, then board your trampler again.
Hide the Captain’s Room
Your layout should also make the captain’s room difficult to locate from inside the ship. Create a maze of doors and ladders that confuses intruders. The more incorrect paths they choose, the more explosives they’ll waste, reducing their chances of reaching the correct room before they run out.
Don’t Give Raiders Free Explosives
Never store bombs or grenades anywhere an intruder can access. I recommend storing all explosives inside the captain’s room. If an enemy reaches that room, you’ve effectively already lost, so there’s no reason to leave them extra C4 along the way.
How to Defend Your Trampler During Extraction
Now that your trampler is properly built, it’s important to use the right strategy. In my experience, 9 out of 10 hijack attempts against solo players happen at the extract. When approaching an extract, always check the top of the radio tower before moving in. If it’s clear, park close enough that you can jump directly from your trampler to at least the second ladder.
Immediately activate the extraction timer. Once the timer starts, the hijacker only has two options:
- Climb the tower and interrupt the extraction.
- Reach your captain’s room in under two minutes.
They can’t simply drive your trampler far enough away to cancel the extract. If they reach your wheelhouse, don’t chase them. Wait until the trampler shuts down automatically, then board it again or simply respawn on it if necessary.
It also helps to angle your trampler so you can see your own entrance from the tower. This allows you to shoot anyone attempting to climb your ladder.
Buy Time
Your goal isn’t necessarily to kill the raider – it’s to waste their time. If they have to fight you instead of placing C4, every second matters. With nearly a dozen reinforced doors between the entrance and the captain’s room, they simply don’t have much time to spare. Even if you die, forcing them into a fight instead of planting explosives can be enough to stop the hijack.
Pro tip: A player must remain stationary for about one second while arming C4, usually with their back turned toward you. That’s the perfect opportunity for an easy headshot.
Final Advice
If you’re playing solo, it’s almost always worth spending extra resources on a larger, more secure trampler. When you’re alone, your trampler is your only reliable backup against a hijack. Investing in its design will save you far more resources than it costs.
Intermediate & Advanced Loot Organization Guide
Many players fill their tramplers with random, unconsolidated loot boxes. Besides being messy, poor organization slows you down and can even help enemy boarders. A well-organized storage system lets you:
- Loot faster and more efficiently.
- Recover more quickly after dying.
- React faster during emergencies, such as running out of ammo or defending against boarders.
This guide assumes you’re already familiar with Quick Transfer and other basic inventory mechanics.
Organize Before the Expedition
During the Load Trampler phase, decide which shelves will hold specific types of items.
Artillery Storage
Dedicate one cargo shelf exclusively to:
- Artillery cannons
- Artillery ammunition
Place this shelf as close to your gun emplacements as possible for faster deployment and reloading. During the expedition, this same storage area should also hold any artillery ammo you loot.
Combat Supplies
Use a separate cargo shelf for combat equipment:
- Spare weapons
- Extra ammunition
- Armor
- Medkits
- Food
- Shovels
- Keys
- Spare fuel
- Time bombs
Keeping these items together makes it much faster to restock your refrigerator before heading back into combat.
Solo Players
This setup is straightforward since you’re managing all supplies yourself.
Crew Play
If you’re playing with a crew, consider separating responsibilities:
- The captain maintains one cargo section.
- The crew uses another.
Since everyone shares the refrigerator, organize it with frequently used equipment such as:
- Spare weapons
- Ammunition
- Armor
- Bombs
This keeps essential gear easy to access during combat.
Loot Enemy Tramplers Efficiently
Before carrying boxes back to your own trampler, spend a few seconds organizing them. Most players never consolidate their loot, which means you’ll often find half-empty boxes filled with low-value weapons and ammunition.
Instead:
- Pick up a box.
- Use Quick Transfer to move its contents into other boxes until it’s empty.
- Drop the empty box.
- Repeat.
Every empty box is one less trip back to your trampler. Before leaving, remove anything you don’t actually want. Discarding low-value items creates room for more valuable loot and may save another return trip. Once everything has been consolidated, move the remaining boxes to your trampler. A useful trick is to throw all the boxes off the enemy trampler first. That way you don’t have to climb their ladder every time you return.
Looting POIs Efficiently
The same principle applies when looting towns and forts. Don’t carry items you don’t need.
If your box is full but you find something valuable, don’t immediately run back to your trampler. Instead, throw away a low-value item, such as common ammo or cheap resources, to make room.
One discarded item is often worth avoiding an entire round trip.
Crew Looting Strategy
With multiple players, assign simple roles.
- Player 1 gathers boxes into one pile.
- Player 2 moves the boxes toward the trampler (or to the base of the ladder).
- Player 3 loads everything into the cargo holds.
This minimizes downtime and keeps everyone moving.
Organize While Traveling
The best time to organize your own loot is while traveling to the next destination, assuming there are no nearby enemies. Instead of waiting until the end of the expedition, organize continuously between stops.
Suggested Cargo Layout
While every trampler is different, this layout works well:
Cargo Area 1 – Main Loot Drop-Off
Place this near the entrance ladder so newly collected loot can be deposited immediately.
Cargo Area 2 – Captain’s Storage
Store valuable equipment and supplies close to the captain’s compartment.
Cargo Area 3 – Crew Storage
Keep crew supplies near the crew quarters. If possible, protect both storage areas with doors so boarders can’t access them easily.
Cargo Area 4 – Artillery Storage
Keep artillery guns and ammunition beside the gun emplacements for quick deployment and reloading.
Consolidation Workflow
Once you’ve finished looting a location:
- Deposit every loot box at your main drop-off area.
- Use Quick Transfer to minimize the total number of boxes.
- Group similar items together, such as:
- Artillery ammunition
- Spare weapons
- Consumables
- Armor
- Rare crafting materials
- Move each consolidated box to its permanent storage location.
A few minutes spent organizing between stops will save far more time over the course of a long expedition.
Crafting Guide
Click to enlarge…

Processing Guide
Click to enlarge…

Key Guide
Click to enlarge…

Useful Tips
Load Cannons Before Placing Them
When you pick up an artillery cannon, it functions as a container. This means you can hold the cannon, open a box containing artillery shells, and load it before mounting it. This saves time during setup. You can also reload a mounted cannon by holding a box of shells and opening the cannon’s inventory directly.
Keep Emergency Gear in the Fridge
Always store your best emergency equipment in your refrigerator and encourage your teammates to do the same. Recommended items include:
- Shotguns (especially Peppermills)
- 15-shot pistols
- Slug shells
- Armor-piercing pistol ammo
- Spare armor
If you’re killed during a boarding attempt, having a fully equipped fridge can allow you or a teammate to respawn, rearm immediately, and turn the fight around.
Never Leave a Single Door to the Captain’s Room
Avoid designs where only one door separates the boarding entrance from the captain’s room. That’s the ideal layout for boarders, since a single explosive can give them direct access to your trampler’s controls. Whenever possible, build multiple layers of doors between the entrance and the wheelhouse.
Don’t Open Doors for Boarders
If you know someone is onboard, don’t open doors just to chase them unless there’s no alternative. Opening doors for them only lets them progress deeper into your trampler. If you must open a door, be ready to fire immediately. A Peppermill or a pistol is ideal for clearing enemies at close range.
Don’t Hand Over Your Explosives
If you’re fighting a boarder who hasn’t brought enough explosives to continue deeper into your ship, don’t accidentally solve that problem for them. Before engaging:
- Store any C4 or bombs you’re carrying in a secure container.
- Avoid leaving explosives in deck storage that’s easily accessible to boarders.
If they can’t reach your explosives, they may be unable to continue the hijack even if they win the fight.
- You can’t open doors on a trampler your crew doesn’t have control of. You may need to destroy several doors with grenades, timebombs or your own trampler’s weapons, before you have access to the Captain’s Quarters. Or you could try waiting for an enemy to open it for you.
- The enemy will be constantly respawning while you’re onboard. A good way to slow them down is to try and remove any food from their shelves, by simply dumping their boxes on the floor, making their respawn timer significantly longer. Destroying cargo compartments achieves the same effect. The refrigerators inside crew compartments and the captain’s cabin are a good place to store food because of this, as the doors on the front of the fridge prevent enemies from accessing the contents. It’s also a good idea to store some weapons and ammo in there too, so you can start fighting back right away when you respawn.
- Destroying the crew cabins on an enemy Trampler also prevents them from respawning, which can be extremely helpful during a boarding action, but as mentioned above, it is not possible to take control of a trampler if the captain’s quarters are damaged, so you may need to repair it first. Bring someone to watch your back!
POI Tips
- Learn the three main types of Points of Interest (PoIs): Civilian, Industrial, and Forts.
- Loot Civilian PoIs for food crates, safes, and medical cabinets. They are the best source of money, food, Leviathan skin, medical mixtures, and other supplies.
- Loot Industrial PoIs for mechanical components, pneumatic parts, gunpowder, and other crafting materials.
- Forts combine loot from both Civilian and Industrial PoIs and also contain crafting stations for making weapons, ammunition, and utility items.
- During Storm Dive events, prioritize looting Forts. They always spawn two Experimental Artifacts.
- Check locked red doors inside Forts, as Experimental Artifacts can sometimes spawn behind them.
Trampler Design Tips
- Hide your reactor behind compartments or other structures so it cannot be hit from the front. As long as the reactor remains intact, your trampler stays operational.
- Mount your main cannons at the front of the trampler. An additional side-mounted cannon can provide extra firing angles.
- Place the steering controls at the very front, as close to the centerline as possible. This improves visibility and makes driving and combat easier.
- Position the Captain’s Quarters in a hard-to-reach location with multiple doors leading to it. This makes it more difficult for enemies to breach and capture your trampler, even if they use grenades or sticky bombs to destroy doors.
- Design the interior for efficient movement. Keep critical areas close together so repairs, refueling, and using the speed boost can be done as quickly as possible.
How to Capture an Enemy Trampler
To capture an enemy trampler, you must reach the Captain’s Quarters (the room decorated with maps and other navigation items). Inside, interact with the small steering wheel on the table by holding F for a few seconds.
If the Captain’s Quarters have been damaged and the steering wheel has been destroyed, you’ll need to repair the room first using your multitool. Repair the damaged metal panels beneath the table and any broken gas pipes. Once the room is fully repaired, interact with the steering wheel to take control of the trampler.
Keep in mind that until you successfully capture the trampler, the defending team can still respawn inside the Captain’s Quarters.
Reaching the Captain’s Quarters
You cannot open doors on a trampler your team doesn’t control. To reach the Captain’s Quarters, you’ll usually need to destroy several doors using:
- Grenades
- Time bombs
- Your own trampler’s weapons
Alternatively, you can wait for a defender to open a door for you.
Slowing Down Enemy Respawns
While boarding, the enemy crew will continue to respawn until you capture the trampler or destroy their respawn points. One effective tactic is to remove their food supply. Simply dump food containers onto the floor or destroy cargo compartments that contain food. With less food available, enemy respawn timers become significantly longer.
For this reason, many experienced players store food inside the refrigerators located in the crew quarters and Captain’s Quarters. The refrigerator doors prevent enemies from accessing the contents until the room itself is breached.
It’s also a good idea to store emergency weapons and ammunition inside those refrigerators so defenders can rearm immediately after respawning.
Destroying Crew Quarters
Destroying the enemy crew quarters prevents players from respawning there, making boarding much easier. However, do not destroy the Captain’s Quarters if your goal is to capture the trampler. A damaged Captain’s Quarters cannot be captured until it has been fully repaired.
Whenever possible, bring a teammate to cover you while repairing and capturing the trampler.

Trampler Cannon Placement Tips
- Keep cannons away from your engine. If a cannon is destroyed, the splash damage can also damage nearby critical components. Spread out important systems whenever possible.
- Match your weapon placement to the weapon type.
- Naval cannons: Best mounted in central, forward-facing positions.
- Autocannons: Work best on the sides or rear, where they have wider firing angles.
- Shotguns: Effective almost anywhere, provided your driver can position the trampler well.
- Build for your crew size. There’s little reason to mount six cannons if only two people are available to operate them.
- Don’t mount weapons you’ll never use. Avoid placing cannons in positions that force you to expose weak angles or that you’ll intentionally keep pointed away from the enemy. They only add weight without providing value.
- Bring more ammunition than you think you’ll need. Running out of ammo is one of the easiest ways to lose a fight.
- A good baseline for three engagements is:
- Autocannon: ~160 rounds
- Naval cannon: ~60 shells
- Shotgun: ~30 shells
- If you expect more PvP, bring additional ammunition. Assume another enemy team may join the fight at any time.
- A good baseline for three engagements is:
Understanding Trampler Statistics
- Maneuverability determines how quickly your trampler can turn. Lower maneuverability means wider, slower turns. This is especially important for smaller tramplers that rely on mobility rather than firepower. You can improve maneuverability by researching and installing Small or Medium Maneuverability Engines.
- Fuel Efficiency determines the maximum amount of fuel your trampler can store. Fuel is displayed in minutes remaining. For example, if the gauge reads 10, you have approximately 10 minutes of fuel left.
- At the start of a match, tramplers begin with roughly half of their maximum fuel.
- To refuel, insert an Energy Rod into the reactor.
- Each Energy Rod restores a significant amount of fuel, but never above your trampler’s maximum fuel capacity.
- Larger tramplers and builds with more maneuverability engines consume fuel faster.
- Stability Impact is mainly affected by the height of your trampler. Taller designs have higher stability impact, which reduces acceleration and lowers top speed. Keeping your trampler as compact as possible generally results in better performance.
- Top Speed indicates your trampler’s maximum movement speed. On flat terrain, a trampler with 100 Speed reaches roughly 40 km/h. For example, a trampler with 75 Speed has a top speed of approximately 30 km/h. Inserting an Energy Rod into the reactor also provides a temporary speed boost, which can increase your speed by 30 km/h or more.
Essential Trampler Building Tips
- Hide your motor reactor behind multiple layers of protection or on a lower deck to reduce the chance of it being destroyed.
- In the early game, place the reactor on the side opposite your main turrets so you can keep your weapons facing the enemy while protecting the reactor.
- Protect your Captain’s Quarters with at least one airlock (an extra room and door). This slows down boarders and makes capturing your trampler more difficult.
- Add an airlock to the entrance ladder so enemies cannot quickly board your trampler during combat.
- Always manually check ladder and door placement before saving a blueprint. Remove unnecessary ladders and replace open entrances with proper doors where needed.
- Avoid over-specializing your trampler. Balance armor, maneuverability, firepower, and cargo capacity instead of maximizing only one attribute.
- Keep at least one turret close to the cockpit so you can drive and operate a weapon efficiently, especially when playing solo.
- Prioritize maneuverability as well as top speed. Better acceleration, braking, and turning often matter more than maximum speed.
- Build for good power efficiency to avoid running out of energy during long fights or extended pursuits.
- Use airlocks to protect other important modules, such as storage and the reactor, by forcing enemies to breach multiple doors before reaching them.
Logistical Offensive Tactic “Blitzkrieg”
- Before engaging an enemy trampler, identify the locations of its reactor, weapons, helm, storage, and exposed crew members.
- Pay attention to the terrain. Hills, rocks, wrecks, and other obstacles can provide cover, create ambush opportunities, or hinder movement.
- Destroy enemy weapons and eliminate exposed gunners first to reduce incoming fire.
- After neutralizing the weapons, target the helm or storage compartments to disrupt the enemy’s ability to operate and resupply.
- Destroy food storage if supplies are kept in standard crates. This limits the enemy’s ability to respawn during prolonged fights.
- If the enemy attempts to escape, target their legs to reduce mobility and make pursuit easier.
- Use a fuel rod speed boost when necessary to catch fleeing enemies.
- Once the enemy is weakened, board their trampler to sabotage it. Remove or discard supplies, disable the reactor, or otherwise prevent the trampler from functioning.
- Use large hills as cover to set up ambushes.
- If you are being pursued, travel through uneven terrain to slow the enemy and create opportunities to reposition.
- Avoid fighting in areas cluttered with rocks, wrecks, or debris, as getting stuck can leave your trampler vulnerable.
- You don’t always need to destroy an enemy trampler. Disabling its weapons, mobility, supplies, or systems is often enough to win the fight.
Locations of Crates
Cities
Venedig
- District Officer Portable Safe
Segen
- Red Door (Red Key required)
Strudel
- Canned Sea Deer
- 1889 Chardonnay
- Factory with craftable Pristine 70mm Cannon
Insel St Clemens
Schwalbenberg
- District Officer Portable Safe
Archipel von Ierpolo
- 1889 Chardonnay
- District Officer Portable Safe
- Canned Sea Deer
Stuffeninsel
- 1889 Chardonnay
- Ficus Plant
Meeresauge
- Canned Sea Deer
- 1889 Chardonnay
- Blue Key Room (Blue Key required)
Kaiserplatz
- District Officer Portable Safe
- Green Key Room (Green Key required)
Factories
Rauchwolke
- Exchange Black Boxes for Circuits
- Canned Sea Deer
- Lighthouse:
- Ficus Plant
- 1889 Chardonnay
Sprengstofffabrik
Crafting
- Rockets
- Pristine Cannon
- Contact Grenades
- Energy Rods
Weapons Tips
- Revolvers are highly ammo-efficient for PvE because many pistol-wielding Upiors drop 8×21mm ammunition.
- Early revolvers deal high damage but reload slowly. Upgrade to later models with speedloaders for better sustained combat.
- The Bantam Revolver is an excellent early-game upgrade thanks to its increased melee damage, allowing you to conserve ammunition.
- Semi-automatic pistols have a higher rate of fire than revolvers but deal less damage per shot.
- Upgrade from the PPS-5 to the 10R or 15R pistol as soon as possible. The larger magazine greatly improves combat effectiveness.
- Shotguns are most effective during boarding actions and close-quarters defense.
- The Vertical Choke upgrade makes the Drobulet Shotgun easier to hit human-sized targets with.
- The Pepper Mill Shotgun is generally more reliable than the single-shot Drobulet because it can fire multiple shots before reloading.
- The Triplet Shotgun delivers massive burst damage but uses all three barrels at once, leaving no follow-up shot if you miss.
- Rifles are best suited for long-range PvP, especially for eliminating enemy crew members on tramplers.
- Pistols are generally more efficient than rifles for PvE since rifle ammunition is rarer and cannot be replenished from Upiors.
- The M82 Rifle offers a good balance between damage and magazine capacity for mid-range PvP, despite its slow reload.
- The Petros Rifle excels at long-range precision shots but is less effective for prolonged firefights due to its single-shot reload and rare ammunition.
- Craft suppressors and scopes for the Petros Rifle at Fort crafting stations or advanced trampler crafting stations to improve its versatility.
- The Great Silence can remotely disable an enemy reactor, making it useful for stopping fleeing targets or escaping pursuers.
- Use Armor-Piercing Rockets against tramplers and High-Explosive Rockets against enemy players.
- AP rockets can be crafted at the production line in Sprengstofffabrik using 10 Fabric and 10 Gunpowder to produce 3 rockets.
- The black key room inside the Storm Dive Dreadnought is one of the best sources of rocket ammunition.
- Use the Orbital Strike Pointer against stationary or immobilized tramplers, as moving targets can often escape the bombardment.
Beginner Tips
If you’re new, expect to lose some early fights while learning the game. Focus on surviving, upgrading your trampler, and extracting loot consistently rather than seeking PvP.
Using Green Flares
Shooting a green flare signals that you’re friendly. Some players will leave you alone after seeing it, although many will still attack, so don’t rely on it for protection.
Reactor Protection
Your reactor is the most important part of your trampler. If it is destroyed, your entire trampler explodes.
Even with a Medium Chassis, you can improve its protection:
- Place compartments in front of the reactor to make it harder to hit.
- Stack compartments so the reactor is not visible from the front.
- Alternatively, place the reactor on one side of the trampler and always keep that side facing away from enemies.
- The reactor does not need to be completely enclosed—it only needs to be difficult to target.
Where to Find Loot
The largest amounts of loot are found in named Points of Interest (POIs) marked on the map.
Some buildings are sealed with red plank barricades, which can be destroyed using:
Outside the main map are smaller random POIs such as wrecked ships. These contain normal loot but nothing exclusive compared to the main map.
Some shipwrecks also contain red doors that can be opened.
Keys
There are two types of keys:
Chest Keys
- Found throughout major POIs.
- Can also drop from zombies.
Quest Keys
Quest-related keys are found separately from chest keys.
All quest keys can be obtained during Voyage expeditions, although the final key can only be used in the Dreadnaught, which is exclusive to Storm expeditions.
Using Fuel Rods
Installing a fuel rod into your reactor provides a temporary speed boost, making it useful for escaping dangerous situations.
Farming Safely
If PvP is proving difficult, you can travel through the Wastes outside the main map.
This area contains:
- AI enemies
- Small random POIs
- Crystal deposits
Crystal farming is a reliable way to earn money:
- Collect crystals.
- Process them into Crystal Dust in your workshop.
- Sell the dust for cash.
- Use the money to purchase scrap if needed.
Selling Loot for More Money
Every fort contains a Contract Station, located on a small platform marked by white smoke.
Selling valuables through a Contract Station pays approximately 2–3× more than selling them back at base.
For maximum profit:
- Carry a storage box.
- Store papers, valuables, and Crystal Dust inside it.
- Sell everything through Contract Stations instead of returning home.
Solo PvP Tips
Winning a fight usually depends on eliminating the enemy player first.
General advice:
- Leave your cannon and fight with firearms while using cover.
- Wait until the enemy fires their cannon before exposing yourself.
- Return to your cannon while they’re reloading.
Good cannon targets include:
- Captain’s Quarters
- Trampler legs
- Wheelhouse
Disabling mobility or respawning often makes destroying the reactor much easier.
Boarding Enemy Tramplers
Successfully boarding an enemy allows you to:
- Steal ammunition.
- Loot the enemy’s equipment.
- Remove and steal enemy cannons.
- Throw enemy cannons overboard.
- Destroy the Captain’s Quarters with 3–5 C4 (depending on tier), preventing respawns.
- Destroy the reactor with at least 6 C4.
Capturing an enemy trampler is generally not recommended.
Reasons:
- Capturing takes about 7 seconds.
- Enemy respawn time is approximately 7.5 seconds.
The enemy will usually respawn before the capture finishes, making reactor destruction the more reliable option.
C4
- Fuse time is approximately 10 seconds.
- You can arm up to 3 C4 charges before the first one detonates.
Trampler Building Tips
- You can use up to 3 Crew Quarters.
- Crew Quarters make excellent reactor protection.
- Connect your entrance to one of the Crew Quarters so your trampler has at least one door.
Fast Black Box Farming
A quick method for collecting Black Boxes:
- Build the cheapest possible trampler.
- Install a single 80 mm cannon.
- Bring only 7–10 rounds of 80 mm ammunition.
- Enter a solo Voyage expedition.
- Travel directly to the nearest extraction point.
- Destroy your own reactor with the cannon.
- Pick up the Black Box.
- Call extraction using the radio.
- Make sure you pick up the Black Box before taking the extraction rope.
- Repeat.
This minimizes the cost of each run while allowing rapid Black Box farming.
Current PvP Balance
New players may struggle against larger, better-equipped tramplers.
Current issues reported by players include:
- Larger ships are difficult to outrun.
- Extraction points are common ambush locations.
- Solo players may encounter unofficial teaming.
- Friendly green flares are not always respected.
The developers have stated that they plan to introduce gear-level-based matchmaking, which should place players against opponents with similar equipment levels.